Xming: bind to IP
Xming is a server1 that can be used to display X11 applications on a Windows machine. The last release of Xming was on 9th August 2016 (almost 8 years ago), but still works just fine on Windows 10. For comparison, the last release of X11 was on 6th June 20122 (12 years ago today!).
Running Xming §
After installation, if you just run Xming with the default settings, it will automatically bind to a network interface. I’m not sure how it decides which one to use, but if it chooses the wrong one, you may be unable to connect.
Binding to an IP §
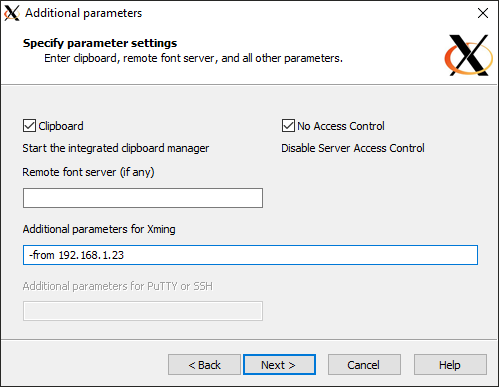
If you need to specify the IP address Xming binds to, then instead run XLaunch (which also gets install by Xming). It lets you choose some configuration options before Xming gets launched.
Specifically, on the “Specify parameter settings” page, use the “Additional parameters” field to set the bind IP address using the format -from <IP>, e.g.:
Access control §
I also found it necessary to enable “No Access Control”.
If you do not want to disable access control, you may want to look into xauth and the ~/.Xauthority file.
Running an application over SSH §
SSH into the machine where the X11 application will run, and make sure to use the -X option. This is necessary to enable X11 forwarding over SSH:
ssh user@192.168.1.97 -X
Then make sure that the DISPLAY option is set to the IP address of the X server, using the X11 Display Names format:
<IP>:<display>:<screen>
By default, display and screen will be 0.
One method is to set the DISPLAY environment variable in your ~/.bashrc so that it gets applied automatically to your bash sessions:
export DISPLAY=192.168.1.23:0.0
To test it works, run the xeyes application, which is an X11 application that should already be installed on the machine.
It should look like this.
